Purpose
ValueFirst Digital developed a wrapper to cater those customers who are using Leadsquared CRM and using ValueFirst WhatsApp API to send messages to their customers.
Step 1 - Leadsquared WhatsApp Client Configuration
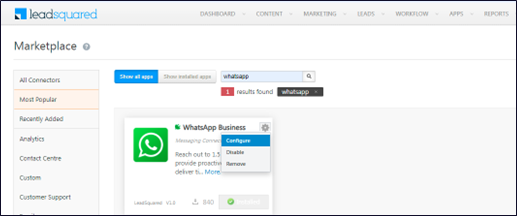
- Install “WhatsApp Business” from leadsquared app marketplace
- After installation, Click on 'Configure' to setup WhatsApp account. (ref. Screen 1.0)
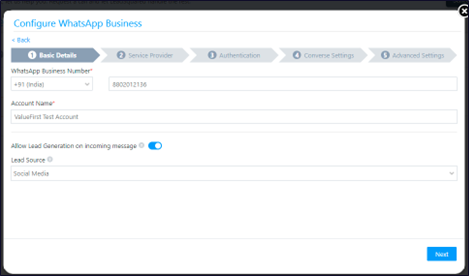
- Click on "Add Number" and screen 2.0 will open, now add mentioned details in it.
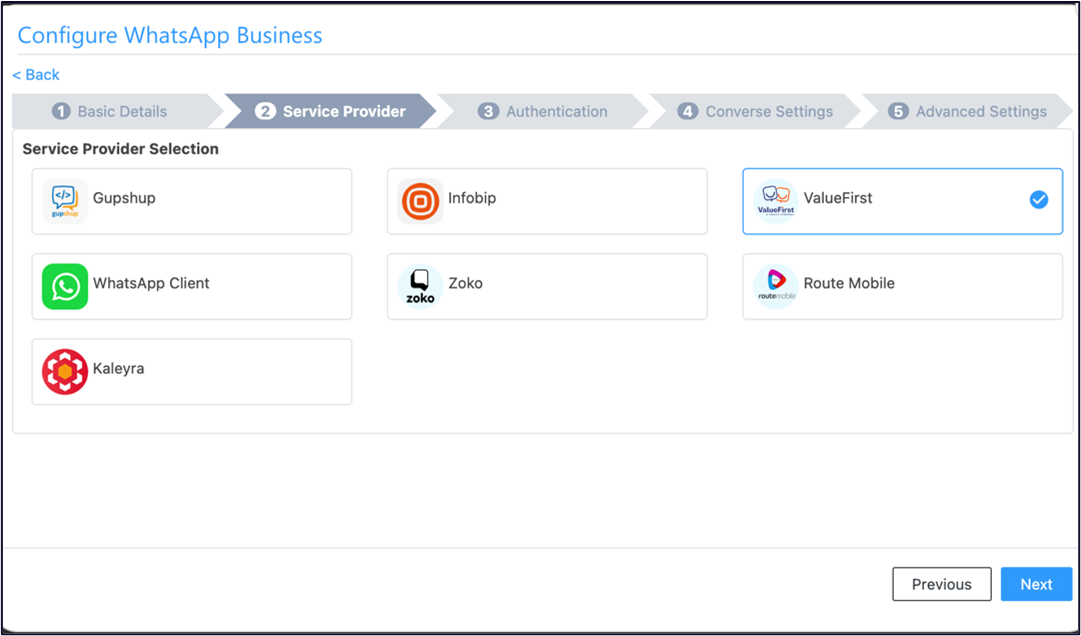
- After adding above details click on 'Next' button and select "ValueFirst" shown on "Screen 3.0" and click on 'Next' button.
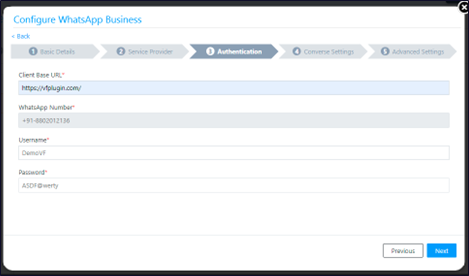
- In "Screen 4.0" LSQ admin has to fill WhatsApp API credentials provided by the ValueFirst and click on 'Next' button to move forward.
Username - provided by the ValueFirst Team
Password - provided by the ValueFirst Team - In "Converse Settings" page no action needed, just click on 'Next' button to proceed further.
- In "Advanced Settings" page few more details will be filled by the LSQ admin to complete the configuration. (ref. Screen 5.0)
Activity Mapping – This is a dropdown field where admin will select "WhatsApp Message".
Default WhatsApp Number Fields – This is a dropdown field where multiple values are there. Admin can select "mobile number or phone number" where WhatsApp messages will be sent.
Default Country Code – Here India country code will be selected.
Enable Rich Media Template Support – Enable this field.
Compliance Type – Opt-Out or Opt-in select one option.
WhatsApp Opt-Out – According to the above selection, a value will be selected from the drop down field.
Now click on "Save & Close" button, after authentication configuration will be saved.
(Screen 1.0)
(Screen 2.0)
(Screen 3.0)
(Screen 4.0)
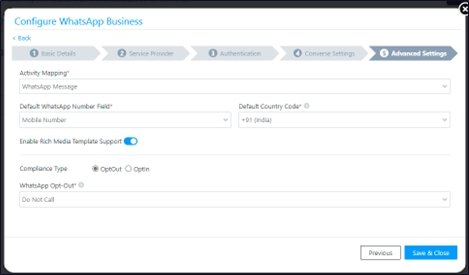
(Screen 5.0)
Step 2 – Adding WhatsApp Templates in Leadsquared
- Go to Apps-> WhatsApp Templates from the top menu
- Click on "Add Template", Screen 6.1 will open where admin can fill the following details to add the template.
Name: Admin can fill the template name and it has to be in small letters with no space. (ref. Screen 6.1)
Namespace: Here ValueFirst template ID will be filled. (ref. Screen 6.1)
Language: Here template language will be entered. (ref. Screen 6.1)
Content – Here template text will be entered. To indicate the variables, insert {{1}}, {{2}} and {{3}} and all variables can be input the LSQ platform. (ref. Screen 6.1)
Media Template – Here media type will be selected to upload the media within the template. (ref. Screen 6.1)
Select Attachment Type – Here static and dynamic values will be selected to upload static and dynamic content. (ref. Screen 6.2)
Document Details – Here URL will be entered or admin can upload the file and can create the URL. (ref. Screen 6.2) - After filling all the details admin will save the template.

(Screen 6.1)
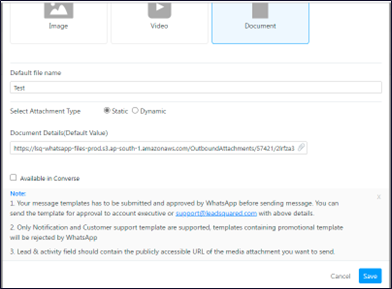
(Screen 6.2)
Step 3 – Last Step to Setup ValueFirst Wrapper
- Open https://vfplugin.com in browser
- Login with same Username and Password which was provide by the ValueFirst team. (pls note login in https://vfplugin.com after doing setup in LSQ) (ref. Screen 7.0)
- After login enter WhatsApp no., Username and Password and authenticate by pressing 'Authenticate' button. A message will be displayed which will show Successfully authenticated ValueFirst account (ref. Screen 8.0)
- After successful authentication copy "Webhook URL" and send to ValueFirst account manager for Inbound message configuration. (ref. screen 8.0)
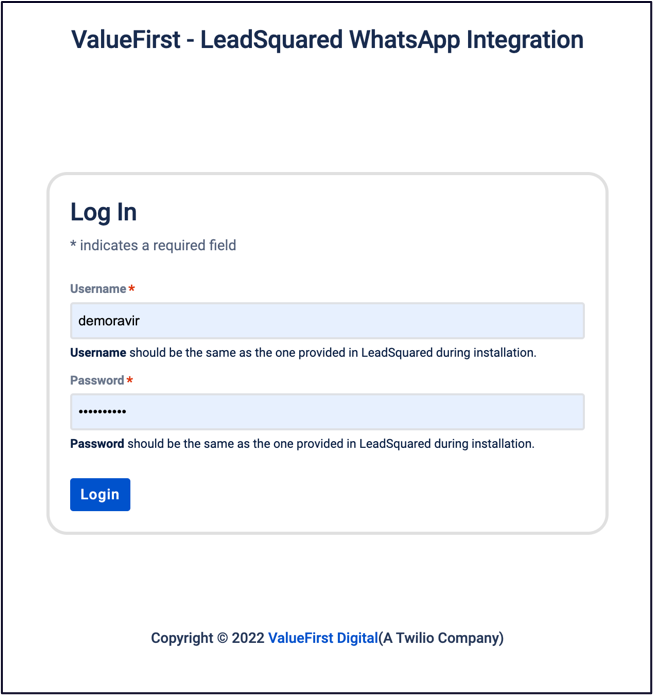
(Screen 7.0)
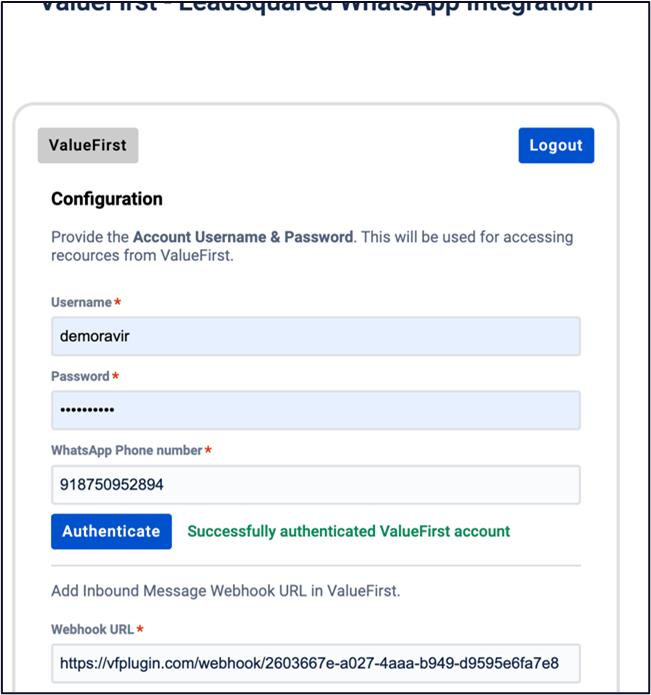
(Screen 8.0)